Brow Shaping Basics: Frame Your Face with Ease
Map, shape, and maintain your brows with pro tips for every face shape—tools, techniques, and fixes for fuller, flattering arches.
Know Your Natural Brow
Before reaching for tools, spend a moment reading your brows like a map. Notice the head (the start near the nose), arch (the highest point), and tail (the taper toward the temple). Observe hair density, texture, and the way strands naturally lay; some brows grow upward, others diagonally, and a few even curl. This growth pattern determines what looks effortless versus overworked. Use a clean spoolie to brush hairs up and out, revealing true shape and any gaps. Stand near soft, even lighting and assess balance and proportion relative to your eyes, nose, and forehead. Your bone structure sets the ultimate guide: the brow bone hints at where lift is flattering, while the socket line shows where depth adds definition. Embrace asymmetry—brows are siblings, not twins—and aim for harmony rather than identical copies. Starting with what you naturally have lets you refine instead of reinvent, creating a result that looks polished yet unmistakably you.
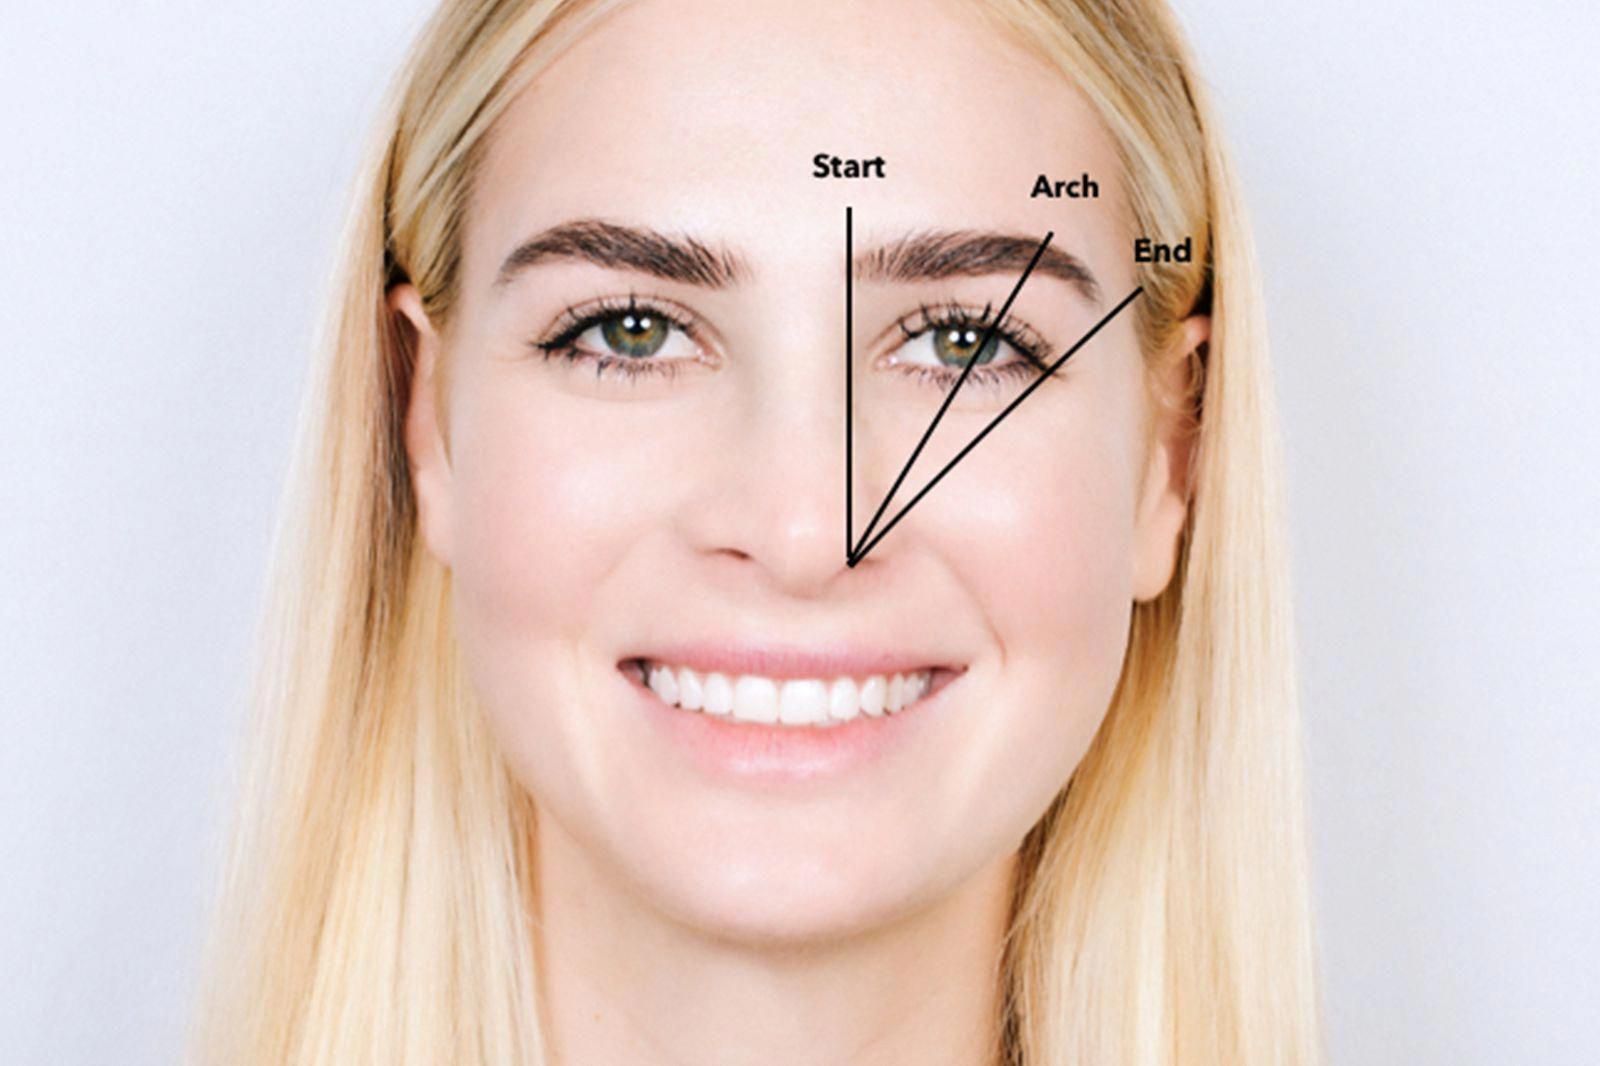
Mapping Made Simple
Brow mapping sets the blueprint so shaping feels calm and precise. Hold a pencil vertically from the nostril to the inner corner of the eye; that line marks where the brow should start, preventing a gap that widens the nose bridge or a start that feels too close. Angle the pencil from the nostril through the iris to find a natural arch that lifts the gaze without looking surprised. Finally, angle from the nostril past the outer corner to mark the tail; stopping here keeps the face lifted and prevents drooping shapes. Lightly dot these points with a brow pencil and connect them with gentle, feathery strokes. Brush through with a spoolie to check symmetry; stand back a few feet to confirm proportion from a distance. This simple tri-point method respects your facial balance, guiding both hair removal and makeup placement so each decision supports structure, not guesswork.
Tools and Techniques That Work
Choosing the right method protects the skin and preserves shape. Tweezers offer precision for stray hairs and fine-tuning; pull in the direction of growth with gentle, steady pressure to minimize breakage. Threading delivers crisp lines for dense or straight hair and suits sensitive skin when done carefully. Waxing can clear larger areas quickly, but keep it conservative around the arch to avoid over-removal. Use brow scissors only to trim tips that extend beyond your mapped outline—less is more. A sharp brow razor can softly clean peach fuzz but avoid carving new edges. Work under bright, indirect light, and consider a regular mirror over magnification to prevent over-tweezing. Prioritize hygiene: sanitize tools, cleanse skin, and finish with a soothing, non-comedogenic gel. Remember the golden rule of restraint—remove a few hairs, reassess, then continue. Technique should shape, not shrink, your brow; the goal is refined volume with clean edges and natural movement.
Shape to Flatter Your Face
Your face shape helps choose a brow contour that feels instantly harmonious. For a round face, a softly angled arch adds length and lifts the cheek area; avoid overly rounded brows that echo the face's curves. With a square jawline, a slightly fuller brow with a gentle peak softens strong angles; keep the tail lifted to balance the jaw. Heart-shaped faces benefit from a subtle arch with a tapered tail to counter a wider forehead and refine attention toward the eyes. Oval faces suit many styles; aim for balanced thickness with a natural arch that follows the brow bone. For long faces, a straighter brow with minimal peak can shorten the vertical line. Adjust thickness to match hair density and features—thicker brows can anchor large eyes or fuller lips, while finer brows complement delicate features. Placement matters: a tail ending at the correct point lifts, while a tail that droops can visually pull the face down.
Filling, Color, and a Natural Finish
Makeup should support your mapped structure without stealing the show. Choose a shade that matches your brow hair or is one tone softer for a natural effect; match undertone too—cool ash for ashy hair, warm brown for golden or copper tones. Pencils define edges and create hair-like strokes; powders softly fill sparse zones; pomades add bold structure for very sparse or coarse brows; gels lift and hold. Begin at the tail where brows are naturally darker, then work toward the head, easing pressure to keep the front soft and gradient. Mimic real hairs using short, upward flicks, and blend with a spoolie after each pass. For subtle lift, add a touch of matte highlight beneath the arch and a satin point at the brow bone's highest area. Finish with a clear or tinted gel to set texture, avoiding crunchy buildup. The result: dimension, definition, and believable fullness.
Aftercare and Growth Support
Post-shaping care preserves comfort and keeps the skin calm. Soothe with a light aloe or fragrance-free gel, and avoid heavy exfoliants or hot steam immediately after hair removal. Keep fingers off the area to prevent irritation. For growth support, look to gentle serums with peptides and conditioners that help brows feel soft and resilient; apply consistently to clean skin. If you try plant oils, patch test first and use sparingly to avoid clogged pores. Brush nightly with a clean spoolie to distribute natural oils and encourage a neat growth pattern. Protect the brow area during daytime with sun protection to maintain even tone and prevent dryness. If trimming, only snip the longest tips after brushing hairs upward, and keep length for structure. Sleep on a smooth pillowcase and avoid harsh rubbing when removing makeup. Maintenance that respects skin health keeps brows plush, glossy, and ready for minimal shaping.
Maintenance and Common Mistakes
A smart routine keeps brows polished without overworking them. Tidy obvious strays weekly, then reassess monthly for a careful reshape guided by your map. Photograph your brows in good light to check symmetry and prevent creeping thinness. Avoid over-thinning the tail—it anchors lift and balance. Don't place the arch too far inward or it may look severe; too far outward and the brow can appear flat. Beware of a squared-off front that appears blocky; a soft fade looks fresher. Resist chasing trends that fight your natural growth pattern; translate them instead—perhaps a slightly fuller front or lifted tail while keeping your core structure. Keep a minimal kit: precision tweezers, spoolie, small scissors, pencil or powder, and clear gel. When in doubt, step away, blink, and view your face from a distance. Your goal isn't identical twins—it's cohesive sisters that frame your features with ease and confidence.